
READING MUSIC WITH WEBRHYTHMS:
LESSON ONE
Welcome to WebRhythms – an easy step-by-step method for learning to read rhythm, created by Vic Firth artist and educator Norm Weinberg. Starting at the very beginning, you’ll progress through 20 lessons where each introduces a new topic. By the end of the series, you’ll be a master at understanding and reading rhythms!
In THIS WebRhythms lesson, we’ll start at the very beginning. Here, you’ll learn the basics of musical notation: the staff, time signature, and quarter notes and rests. The exercise you’ll be working on in this lesson will include audio play-along tracks in five different levels that you can use to track your progress!
HOW THE MUSIC NOTATION SYSTEM WORKS
Learning to read music notation is easy! The notation system that we use in Western Music is really very clever. In a small amount of space and with relatively few symbols, a composer can convey some very specific instructions to a performer about how a musical composition should sound. Music is written on a five-line grid that is called the “staff”.
Musical notation can express the length of each note, the pitch of each note, the instrument, the speed of the piece, and even how loud or soft to play. The music tells us when each note is to begin and indicates the duration or length of each and every note of the music. This indication of duration is determined by the note’s unique visual shape. This example shows the various parts of a note and labels them with their musical name.
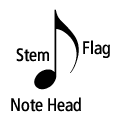
Each note always includes a “note-head”. Every time you see a note-head, you will hear a note. It’s really just that simple! A note-head can either be open (white or hollow), or closed (black or filled). Sometimes the note-head can have a stem attached. As shown in the example below, the stem can either go up or down, depending upon the note’s position on the staff. Notes below the center line of the staff generally have stems that are up. Notes on or above the center line of the staff have down stems.

For most of the WebRhythm exercises, we will be following a slightly different convention. Very often, percussion music that calls for only one instrument (for example the snare drum) can be written on the third space of the staff with the stems going up. There is a long history for this type of notation, and while it’s not exactly “following the rules” it is an accepted practice.
Flags and beams are also used in determining a note’s duration. A stem can have any number of flags attached, but you rarely see more than three. Below is a chart that shows the most common note types along with their names. There are other symbols used to determine duration, but we will discuss them in later lessons.
Let’s define a few terms before we discuss how to play the exercise in this lesson.

Time Signature
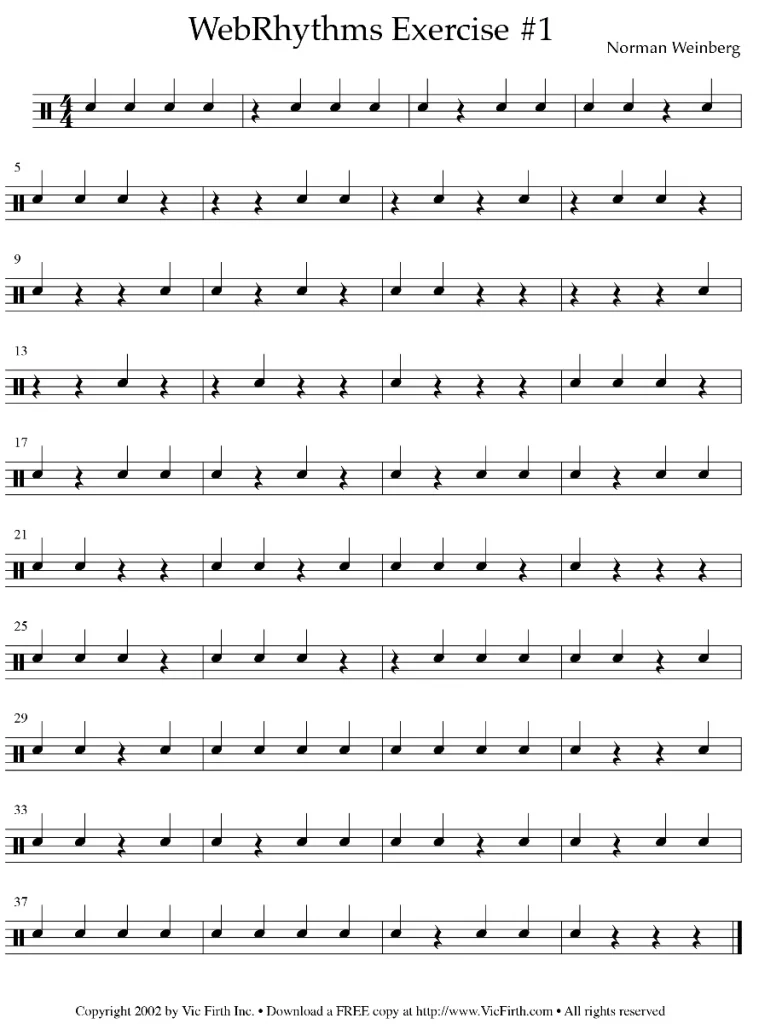
This is the marking at the very beginning of the music that looks like two numbers. In the first MEASURE in the example below, you will count the numbers “1,2,3,4” out loud at a steady speed, and play a note every time you speak a count. You will hit the drum four times, and the distance between the strikes (the speed of the notes) should be exactly the same.

In the second measure of the example above, you see a quarter REST followed by three quarter notes. The quarter rest is exactly the same as the quarter note in every respect except one: The quarter note instructs the musician to make a sound, while the quarter rest is an indication to make no sound (to be silent). To play this measure, count “1,2,3,4” and only strike the drum on counts two, three, and four. You must still speak count one out loud, just don’t play a stroke.
Believe it or not, that’s about all there is to it!
If you see a quarter note, strike the drum on the proper number within the bar. If you see a quarter rest, count the number, but don’t play anything. Since these notes are all the same duration, they will need to move at the same speed.

PRACTICE THIS EXERCISE WITH THE PLAY-ALONG TRACKS!
PRACTICE SUGGESTIONS:
Hint #1 – Be certain that the speed of your counts is steady and consistent. There should be no pause between measures and no pause between lines.
Hint #2 – Go slowly at first. I have a saying in my studio that goes “If you can’t play it, you’re too fast!”. I guarantee you that you won’t keep these exercises up if you feel that you are a failure. No one likes to do something that they feel they’re not good at doing. Take it very slowly at the beginning and have a successful experience. If you’re having trouble, SLOW DOWN! Then, pat yourself on the back for doing a good job and do it again.
Hint #3 – Do it again, and again, and again. A quick analogy: If a basketball player makes a free throw shot, what are the chances that he will make the same shot the next time? It really depends, doesn’t it? If the player is only shooting 20% from the free throw line, his chances aren’t too good. If the player has an 93% record, his chances are better. During basketball practice (and the key word here is practice), a player may spend two hours shooting free throws in order to build up his average. If you can read this exercise one time without any mistakes, what are your chances of getting is correct the second time? It really depends, doesn’t it? If you play this exercise fifty times in a row without errors, then you will be pretty certain that the fifty-first time will also be perfect. Begin at the “bronze level” (with metronome set at 60 beats per minute) and when it becomes boring, try it at the “silver” level. When that becomes a bore, increase the tempo again, but only when the performances at the slower speeds are rock solid.
Hint #4 – Always count out loud. Drummers have a distinct advantage over wind players in that they can count while they play. Counting out loud will serve as some additional feedback to your ears and your eyes that everything is going along OK. And it really helps your concentration!
Hint #5 – As you count out loud, keep your verbal counts short and crisp. This way, you will be able to hear where the sound of the drum is supposed to occur. If you draw out the verbal count, it becomes harder to synchronize the sound of the drum to the syllable of the count.
Hint #6 – Always try to keep your eyes if front of your hands. This means that while your hands are playing count one, your eyes need to be looking at count three. Every count is placed into a short-term memory location in your brain. As you play the count, your eyes are already looking ahead to see what you have to do for the next count. This occurs when you read English. Your eyes are scanning the words that are coming up while your mouth is saying the words that your memory recalls.
To review the helpful hints:
1. Keep your counts steady.
2. If you can’t play it, you’re too fast.
3. Play each exercise several times (25-50).
4. Count out loud.
5. Keep your counts short and crisp.
6. Keep your eyes in front of your hands.
Reading music with WebRhythms is easy! Once you’ve mastered this, you’re ready to move on to the next lesson!


